TILT SHIFT LENSES: DEPTH OF FIELD
Tilt shift lenses enable photographers to transcend the normal restrictions of depth of field and perspective. Many of the optical tricks these lenses permit could not otherwise be reproduced digitally—making them a must for certain landscape, architectural and product photography. This part of the tutorial addresses the tilt feature, and focuses on its use in digital SLR cameras for controlling depth of field. The first part of this tutorial focused on using tilt shift lenses to control perspective and create panoramas.
OVERVIEW: TILT SHIFT MOVEMENTS
Shift movements enable the photographer to shift the location of the lens's imaging circle relative to the digital camera sensor. This means that the lens's center of perspective no longer corresponds the the image's center of perspective, and produces an effect similar to only using a crop from the side of a correspondingly wider angle lens.
Tilt movements enable the photographer to tilt the plane of sharpest focus so that it no longer lies perpendicular to the lens axis. This produces a wedge-shaped depth of field whose width increases farther from the camera. The tilt effect therefore does not necessarily increase depth of field—it just allows the photographer to customize its location to better suit their subject matter.
CONCEPT: SCHEIMPFLUG PRINCIPLE & HINGE RULE
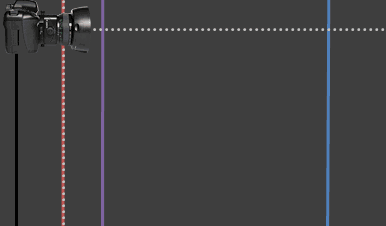
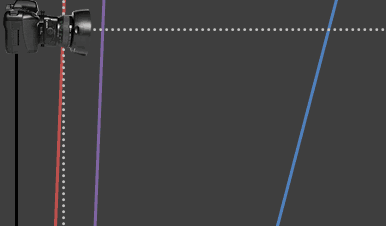
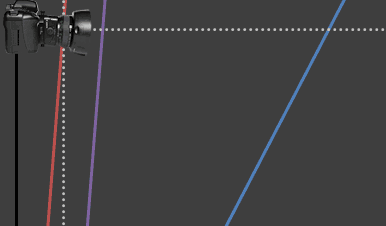
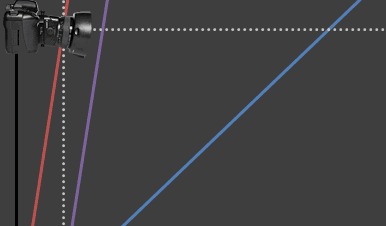
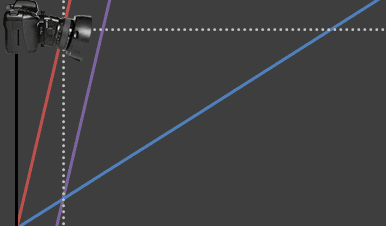
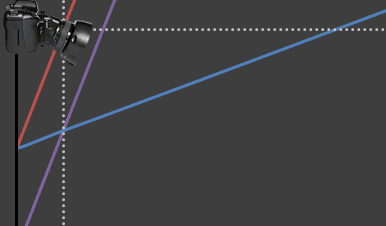
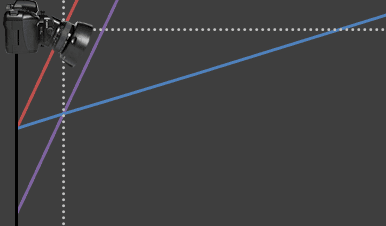
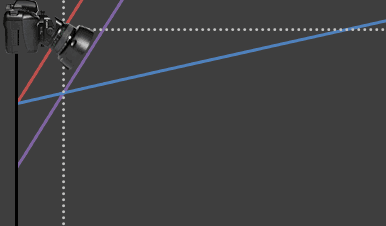
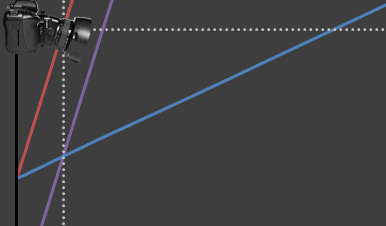
The Scheimpflug principle states that the sensor plane, lens plane and plane of sharpest focus must all intersect along a line. In the diagram below, this intersection is actually a point since the line is perpendicular to your the screen. When the Scheimpflug principle is combined with the "Hinge" or "Pivot Rule," these collectively define the location for the plane of sharpest focus as follows:
 |
Apply Lens Tilt: |
||
| 0.0° | |||
| 0.5° | |||
| 1.0° | |||
| 2.0° | |||
| 3.0° | |||
| 4.0° | |||
| 5.0° | |||
| 6.0° | |||
| 8.0° | |||
| — sensor plane | — lens plane | — plane of sharpest focus | |
Figure based on actual calculations using Canon's 45 mm TS-E lens; vertical scale compressed 2X.
Purple line (—) represents plane parallel to lens plane and separated by the lens focal length.
Try experimenting with different values of tilt to get a feel for how this influences the plane of sharpest focus. Notice that even a small lens tilt angle can produce a correspondingly large tilt in the plane of sharpest focus.
The focusing distance can also change the plane of sharpest focus along with tilt, and will be discussed later in this tutorial. Also note that for the sake of brevity, the rest of this tutorial will use "plane of sharpest focus" and "focus plane" synonymously.
TILT MOVEMENTS TO REPOSITION DEPTH OF FIELD
Depth of field for many scenes is often insufficient using standard equipment—even with small lens apertures. The problem is that one could use even smaller apertures to increase depth of field, but not without also increasing softness at the camera's focus plane due to diffraction. Tilt movements can sometimes avoid this technical limitation by making more efficient use of the depth of field, depending on the subject matter.
The example below demonstrates the effect of tilt movements on a scene whose subject matter traverses both up/down and front/back directions. Each image is taken using a wide aperture of f/2.8 to make the depth of field more noticeable at this small image size.
 Zero Tilt
 3° Downward Tilt
Rug DoF Increased
Lens DoF Decreased
mouseover to view at f/16
 8° Upward Tilt
Apparent DoF Decreased
DoF = Depth of Field; Camera lens aimed downward approx. 30° towards rug.
All images taken at f/2.8 using the Canon 45 mm TS-E lens on a full 35 mm frame sensor.
Center image at f/16 brightens due to reduced vignetting.
On the left we see the typical depth if field produced by an ordinary lens. In order to get both the front and rear rug edges sharp in the left image we would have needed to use a very small aperture. The central image, however, is able to achieve this even with the same aperture. On the other hand, note how the vertical depth of field has decreased and caused the top of the front lens to be blurred.
 Downward Tilt
Only Lens Tops in Focus
mouseover to view at f/5.6
Tilt can also be used to reduce apparent depth of field, as demonstrated by the 8° upward tilt image. This can be particularly useful for portraits when a wide aperture is insufficient, or when one wishes to focus on only part of a vertical object. Note how both the rug and vertical depth of field appear to have decreased. This is because the focus plane is at an angle in between the rug and lens. Also note how the field of view has moved downward due to the tilt, which should be taken into account.
Another possibility would be to place the depth of field both above and parallel to the rug, such that only the tops of the two lenses are in sharp focus (right image). This type of placement is common for many types of flower shots, since these have a geometry similar to this rug/lens example.
For landscapes and architecture, however, the goal is usually to achieve maximal sharpness throughout. In the rug/lens example this would require placing the focus plane slightly above and parallel to the rug with a small aperture.
Deciding where to optimally place the focus plane can become a tricky game of geometry, particularly if the subject traverses both front/back and up/down directions. This requires considering not just the angle of the focus plane, but also the shape of the depth of field.
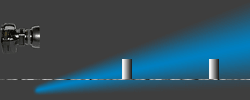
Instead of the usual rectangular region for an ordinary lens, the depth of field for a tilt shift lens actually occupies a wedge which broadens away from the camera. This means that placement of the depth of field is more critical near foreground subject matter.
| Large Aperture | Small Aperture |
 Ordinary Camera Lens
| Large Aperture | Small Aperture |
 Tilt Shift Lens
Blue intensity qualitatively represents the degree of image sharpness at a given distance;
actual depth of field can be unequally distributed to either side of the focus plane.
Note how using a small aperture with a tilt shift lens can become very important with vertical subject matter—and increasingly so if this subject matter is in the foreground, or with a more horizontal focus plane.
Traditional view cameras (ie, old-fashioned looking camera with flexible bellows) can use virtually any amount of lens tilt. However, the Nikon and Canon tilt shift lenses are limited to 8.5 and 8 degrees of tilt, respectively. This means that achieving optimal sharpness throughout is often a compromise between the best possible location for the focus plane and the constraints caused by a narrow range of tilt. This can sometimes occur when one requires a horizontal focus plane, since this may not always be achievable with just 8 degrees of tilt. The example below demonstrates an alternative placement:
 Optimal Depth of Field Placement
(if wide range of tilt angles available)
 Best Available Depth of Field
(if horizontal placement not possible)
The key is to optimally place not only the focus plane, but also its wedge-shaped depth of field. Note how in the right image the focus plane crosses the floor, which ensures that depth of field is most efficiently distributed across the floor and two subjects. In this example the crossover distance is positioned just before the hyperfocal distance of the corresponding untilted lens, since there is minimal vertical subject matter. For other subject distributions, proper placement depends on the relative importance of subject matter and the artistic intent of the photograph.
A more sophisticated possibility is to use a combination of tilt and shift. This could have been accomplished by first aiming the camera itself slightly towards the ground, thereby rotating the focus plane even further than possible using lens tilt alone. One could then use shift to change the field of view—thereby maintaining a similar composition as the original unshifted camera angle, but with a different perspective.
Overall, even if one cannot tilt enough to place the focus plane at the best possible location, one can usually still use some tilt and be better off than what would have been achievable with an ordinary lens. The only exception is when there is vertical subject matter in the foreground which fills a significant fraction of the image, in which case zero tilt is usually best, although shift movements are likely to be helpful.
FOCUSING A TILT SHIFT LENS
Mentally visualizing how tilting a lens will correspond to changes in the depth of field can be quite difficult, even for the most experienced of photographers. Even then, knowing where to best place the focus plane is only half the battle—actually putting it there can be a different matter entirely.
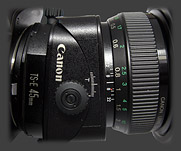
The reason focusing can become so difficult is because the focusing distance and the amount of tilt do not independently control the focus plane's location. In other words, changing the focusing distance changes the angle of the focus plane in addition to changing its distance. Focusing can therefore become an iterative process of alternately adjusting the focusing distance and lens tilt until the photo looks best.
Perhaps the easiest scenarios are those which demand more tilt than the lens supports. In these cases one can just use maximal tilt in the chosen direction, then choose the focus distance which achieves the best available depth of field placement. No tilt/focusing iterations are required.
For more difficult focusing scenarios, tilt shift lenses are usually focused using trial and error techniques through the viewfinder. This works by following a systematic procedure of alternating between setting the focusing distance and tilt, with the aim of having the focus plane converge onto the desired location. Since accurate focusing requires consistent and careful attention to detail, using a tripod is almost always a must.
The following procedure is intended for situations where the subject lies primarily along a horizontal plane or some other plane which is rotated relative to the camera's sensor:
| Focusing Procedure for a Tilt Shift Lens | |
|---|---|
| (1) Compose | Set lens to zero degrees tilt and frame the photograph |
| (2) Identify | Identify critical nearest and furthest subjects along the subject plane |
| (3) Focus | Focus at a distance which maximizes near and far subject sharpness in the viewfinder (if far subject is at infinity, this distance will be at or near the hyperfocal distance).
Once an approximate distance is identified, rock the focus ring back and forth slightly to get a better estimate of this distance. |
| (4) Tilt | Very slowly apply progressively more lens tilt towards the subject plane until near and far subject sharpness is maximized in viewfinder.
Once an approximate tilt angle is identified, slightly rotate the tilt knob back and forth to get a better estimate of this angle. |
| (5) Refine | Repeat steps (3) and (4) with smaller changes than before to identify whether this improves both near and far subject sharpness; if no further improvement then the focusing procedure is complete. |
For more on step (3) above, see tutorials on depth of field and the hyperfocal distance.
For landscapes, one should generally put more weight on having the furthest subject sharp.
Overall, the above procedure aims to give robust results across a wide range of scenarios;
for more exact focusing under specific conditions, refer to the calculators/charts later in this tutorial.
Also note that using the camera's focus points and focus lock confirmation can be of great help. Even though tilt shift lenses do no work with a camera's autofocus, your camera can still be used to notify when you have achieved successful manual focus. Select a focus point which is on your subject and use the focus lock lights in the viewfinder to confirm when your tilt or focusing has successfully brought this subject into focus.
With practice, visual procedures work fine, but ultimately nothing beats having a better intuition for how the process works. One is encouraged to first experiment heavily with their tilt shift lens in order to get a better feel for using tilt movements.
TOOLS TO MAKE TILT SHIFT FOCUSING EASIER
Trial and error techniques can be problematic due to the limited size of viewfinders used in 35 mm or cropped digital camera sensors. This can make it very hard to discern changes in sharpness—particularly in low light, or with tilt shift lenses having a maximum aperture of f/3.5 or a wide angle of view. However, several tools are available which may make this process easier.
A special texturized manual focusing screen can ensure the eye has a clear reference to compare with out of focus objects. Otherwise one's eye can get tricked and try to make objects appear in focus even though these objects are not necessarily in focus in the viewfinder. In such cased the eye effectively becomes a part of the optical system.
Alternatively, if your camera supports real-time viewing using your camera's LCD (Live View) this can be of great help. One can also take a series of test photographs and then zoom in afterwards to verify sharpness at critical points.
A magnified viewfinder can also help, such as Canon's "angle finder C" or one of many third party viewfinder magnifiers. Many of these are at a right angle to the viewfinder, which can make for more convenient focusing when the camera is near the ground.
FOCUSING TECHNIQUE FOR LANDSCAPE PHOTOGRAPHY

Tilt movements for landscape photography often require a focus plane which lies along a sweeping, near horizontal subject plane. In these situations it is very important to place the focus plane accurately in the foreground. The vertical distance "J" is easy to set because it is only determined by the lens tilt, not focusing distance.
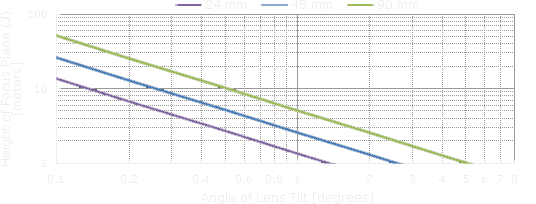
Once the desired value of J has been determined and the corresponding tilt set, one can then independently use the focusing distance to set the angle of the focus plane. Setting the lens's focus ring to farther distances will simultaneously increase the angle of the focus plane and the angular depth of field, as demonstrated in the next section.
TILT SHIFT LENS DEPTH OF FIELD CALCULATOR
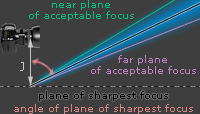
The calculator below uses the lens focal length, lens tilt and untilted focusing distance to locate the plane of sharpest focus.
To also estimate depth of field, click "show advanced" to input aperture and sensor size as well.
Assumes thin lens approximation, with greatest error for focusing distances near infinity or close up.
The circle of confusion is the standard size also used in the regular depth of field calculator.
"Untilted Focus Distance" is (approximately) the distance labeled on your lens's focus ring.
Note how small changes in tilt lead to large changes in the focus plane angle, and that tilt is correspondingly less influential as the tilt angle increases. Also observe how the untilted focusing distance can have a significant impact on the focus plane angle. Similar to ordinary depth of field, the total angular depth of field (near minus far angles of acceptable sharpness) decreases for closer focusing distances.
USING SHIFT TO FURTHER ROTATE THE FOCUS PLANE
The next calculator is useful for situations where tilt and shift are used together to achieve an even greater rotation in the focus plane. With an ordinary camera lens, the angle of the focus plane changes when the camera is rotated, since the focus plane is always perpendicular to the lens's line of sight. With a tilt shift lens this is no different. However, the key is that with a tilt shift lens, we can rotate the camera slightly and then use a shift movement to ensure the same field of view (same composition).
 Ordinary Unrotated Lens
 Rotated Ordinary Lens
Rotates plane of focus,
different field of view
 Rotated Lens With Shift
Rotates plane of focus,
maintains field of view
Blue intensity qualitatively represents the degree of image sharpness at a given distance;
light gray line lies along the center of the photograph.
The calculator below demonstrates how much one would have to rotate their camera in order to offset a given lens shift, which is also equal to the rotation in the focus plane. This would achieve a rotation in the focus plane similar to the top left and right images above, with also the same field of view.
Rotation in focus plane is relative to its location for camera/lens with same field of view, but no shift.
Note how shift can rotate the plane of sharpest focus much more for shorter focal lengths. This is because in absolute units, a given mm shift corresponds to a greater rotation in in the field of view. On the other hand, this also means that the perspective will be more strongly influenced for shorter focal lengths, which may be an important consideration.
Be aware that using shift to rotate the focus plane may require that your tilt shift lens be modified so that it can tilt and shift in the same direction, which is usually not the case by manufacturer default. This can be sent to the manufacturer for modification, or can be performed yourself with a small screwdriver. One needs to remove the four small screws at the base of the lens, rotate the base 90°, and then screw them back into the base.
AVAILABLE NIKON & CANON TILT SHIFT LENSES
Canon has four and Nikon has three mainstream tilt shift lens models available:
| Canon Tilt Shift Lenses | Nikon Tilt Shift Lenses |
|---|---|
| Canon 17 mm TS-E f/4L | |
| Canon 24 mm TS-E f/3.5L II | PC-E Nikkor 24 mm F3.5D ED |
| Canon 45 mm TS-E f/2.8 | PC-E Nikkor 45 mm F2.8D ED |
| Canon 90 mm TS-E f/2.8 | PC-E Nikkor 85 mm F2.8D ED |
Calculations and diagrams above have been designed to represent the range of tilt and shift movements relevant for these lenses on the 35 mm and cropped camera formats.
Note that this tutorial primarily discusses the tilt feature; for shift movements visit part 1:
Tilt Shift Lenses: Using Shift to Control Perspective or Create Panoramas


