
 Helpful Posts: 0
Results 1 to 20 of 27
Thread: Morvern viewed from Mull
-
27th September 2012, 05:15 PM #1


- Join Date
- Aug 2011
- Location
- Wick, Caithness, Scotland.
- Posts
- 2,609
- Real Name
- Sharon
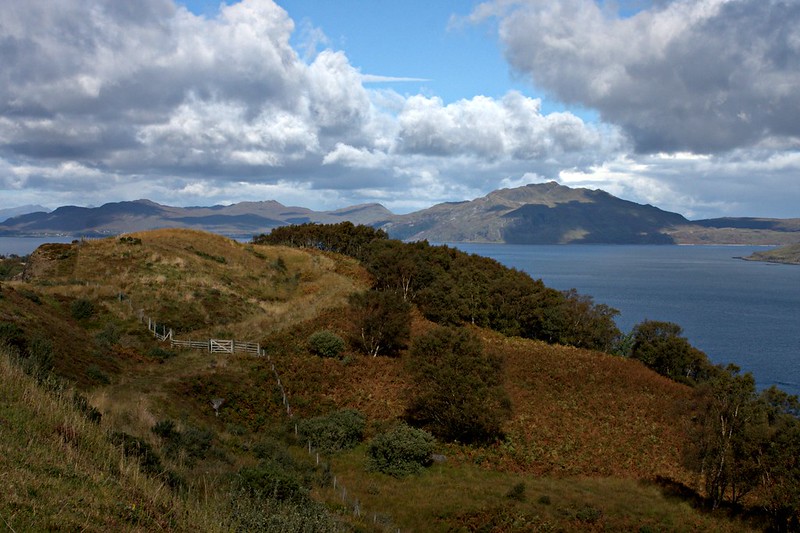
Morvern viewed from Mull
Last edited by Donald; 27th September 2012 at 05:51 PM.
-
27th September 2012, 05:43 PM #2
- Join Date
- Sep 2012
- Location
- San Antonio, Texas
- Posts
- 1,749
- Real Name
- Sergio
Re: Morvern viewd from Mull
Sharon, I don't know why you would want it deleted, but if you must, before you do, let me say I think it's a great view and I really like the colors in this photo. Originally Posted by Daisy Mae

Serge
MOD EDIT - I think Sharon meant me to delete her message that asked me to edit the title, rather than to delete the imageLast edited by Donald; 27th September 2012 at 05:52 PM.
-
27th September 2012, 05:53 PM #3
- Join Date
- Aug 2011
- Location
- Wick, Caithness, Scotland.
- Posts
- 2,609
- Real Name
- Sharon
Re: Morvern viewd from Mull
No.... I don't want the pic deleted Serge..just the post asking Donald to correct my spelling in the title!

Thank you for your lovely comment.
-
27th September 2012, 06:13 PM #4
- Join Date
- Sep 2012
- Location
- San Antonio, Texas
- Posts
- 1,749
- Real Name
- Sergio
Re: Morvern viewd from Mull
lol on me, but glad to hear it.
Serge
-
27th September 2012, 06:39 PM #5
- Join Date
- May 2012
- Location
- northern Virginia suburb of Washington, DC
- Posts
- 19,064
Re: Morvern viewd from Mull
It's almost as if the clouds mirror the contour of the land. A really nice image.
Consider brightening the fence. I realize it's a small part of the image, but it's very appealing and it might do well to make it a bit more apparent.
-
27th September 2012, 06:50 PM #6
- Join Date
- Apr 2011
- Location
- Ontario (mostly)
- Posts
- 6,667
- Real Name
- Bobo
Re: Morvern viewd from Mull
A very non-Sharon image but excellent as always.
LOL - Mike you see things in things that ..... I have no words. But now that you mention it, you are right.
-
27th September 2012, 06:56 PM #7
- Join Date
- Aug 2011
- Location
- Wick, Caithness, Scotland.
- Posts
- 2,609
- Real Name
- Sharon
Re: Morvern viewd from Mull
Thanks Bobo
Mike...I agree but wouldn't know how to do that.
If you can explain ..very slowly and step by step..how to do it on Elements 8 than I would be very interested.
Last edited by Daisy Mae; 27th September 2012 at 07:14 PM.
-
27th September 2012, 09:54 PM #8
- Join Date
- May 2012
- Location
- northern Virginia suburb of Washington, DC
- Posts
- 19,064
Re: Morvern viewd from Mull
Hopefully someone else will explain, Sharon. I can probably figure out how to do it in PSE but my version is 6, not 8. If someone else doesn't get back to you, I'll do my best to explain it.
-
27th September 2012, 11:41 PM #9

- Join Date
- May 2011
- Location
- Fort Mill, South Carolina, USA
- Posts
- 6,294
- Real Name
- Frank Miller
Re: Morvern viewd from Mull
A very refreshing view Sharon. Makes me want to open the fence and walk the path to see where it leads - and yes, bring my camera along in case anything else interesting appears!
-
28th September 2012, 01:33 AM #10
- Join Date
- May 2012
- Location
- northern Virginia suburb of Washington, DC
- Posts
- 19,064
Re: Morvern viewd from Mull
How to brighten the fence
These steps work in PSE6. The menu items may be different in your version but the steps should otherwise be essentially the same.
You asked for "very slowly...step by step," so...
1) Right click the layer displayed on the right >> Click Duplicate Layer >> Click OK
2) Click the Magnifying Glass icon. >> Click the image until the fence is sufficiently large. If you need to reduce the size of the magnification, Alt+Click the image.
3) Click the Magic Wand icon. >> In the mini toolbar located immediately below the Main Toolbar, enable Contiguous. >> Set the Tolerance value to 5 as a starting point. You may need to change this value to something more practical. (Now that you have set those two parameters, once you click on the fence PSE will automatically select all areas of the image that are both contiguous and have a luminosity value within 5 units of the area that you click. Doing so will hopefully select at least parts of the fence and -- more importantly -- only the fence.)
4) Click the fence. Ideally, the marching ants that indicate the selected area of the image will only be around the fence. If it doesn't work well, click the Backward History Arrow (or whatever it's called) to undue the previous step and try again. You may have to click in a different area of the fence and you may have to change the Tolerance value. If the entire fence isn't selected, don't worry. You can return to this step later.
5) In the Main Toolbar, open the Enhance menu. >> Click Adjust lighting. >> Click Brightness/Contrast >> Enable Preview. (This allows you to see the changes being made to the image as you adjust the brightness.) >> Adjust the Brightness slider to your liking.
6) If you were not able to select enough of the fence in Step 4, repeat Steps 4 & 5 until you have brightened enough of the fence to your liking.
7) In the Main Toolbar, open the Layer menu. >> Click Flatten Image. >> Save the file.
I was working with your really small image to make the change shown below. When you use your full-size image, selecting the fence will be easier and the results will be more effective.

Last edited by Mike Buckley; 28th September 2012 at 01:42 AM.
-
28th September 2012, 01:40 AM #11
- Join Date
- May 2012
- Location
- northern Virginia suburb of Washington, DC
- Posts
- 19,064
Re: Morvern viewd from Mull
When I loaded your image into PSE, the program told me that no color profile is associated with the image. That indicates that you did not embed one when you saved the file. You should embed the sRGB color profile in your image file as part of the procedure when you save it for display on the Internet. Otherwise, people viewing your image on the Internet using a browser that is not color-managed will not see any where near the colors that you intend for them to see.
-
28th September 2012, 10:42 AM #12
- Join Date
- Aug 2011
- Location
- Wick, Caithness, Scotland.
- Posts
- 2,609
- Real Name
- Sharon
Re: Morvern viewd from Mull
Thank you for that step by step Mike. i will give it a try later today.
As for not embedding the colour profile when I saved the file......pfffft, Mike I didn't know there was such a thing!
I dont use photoshop very often at all as It is extremely frustrating. I may have a good eye for a shot but am not at all technically minded.
I take a picture, I upload it to Picassa and edit it there or on Picmonkey and then save it back to Picassa.
This involves me pressing buttons marked SAVE and giving it a title....end of. No colour profiles or the like. :/
Any advice you have is most welcome.
-
28th September 2012, 11:26 AM #13
- Join Date
- May 2012
- Location
- northern Virginia suburb of Washington, DC
- Posts
- 19,064
Re: Morvern viewd from Mull
I'm surprised and lost that Picassa's Save process doesn't provide an option to embed a color profile. I don't use Picassa but I wonder if that is handled in your Preferences settings (or whatever they're called). Look for two possible settings perhaps in a sub-setting called Color Management or something similar. One setting might provide the option to use a particular color profile when loading an image into Picassa. Another setting might provide the option to embed a particular color profile upon saving the file. NOTE: Some software makes an important distinction between "embedding" and "converting" a color profile. If so, you definitely want to use "embed" in this situation.
By the way, your camera surely provides a setting that determines the color profile that the camera uses. I don't know if it embeds the profile (probably not considering that your image had no embedded color profile, unless Picassa stripped it, which is even more doubtful).
There are lots of threads about color profiles here at CiC and probably a tutorial. Considering the really creative stuff that you do, it's important that you gain a working command of color profiles, as the choices that you make with regard to them will certainly affect your viewers' impressions of your work.
-
28th September 2012, 11:49 AM #14
- Join Date
- Aug 2011
- Location
- Wick, Caithness, Scotland.
- Posts
- 2,609
- Real Name
- Sharon
Re: Morvern viewd from Mull
http://support.google.com/picasa/bin...&answer=187444
This?
Camera..canon 40D is set to sRGB
starting to feel a bit stupid now.
Oh...picmonkey and pxlr both strip my exif.
-
28th September 2012, 12:04 PM #15
- Join Date
- Sep 2012
- Location
- Letchworth Garden City, UK
- Posts
- 38
- Real Name
- Ivor J Roberts
Re: Morvern viewd from Mull
This is beautiful picture, lovely colours, and I assume it was taken late summer, early autumn. The one thing that I did notice however, was the fence and gate, where the fence continued to the left, taking my eye to that side of the image. I am not sure if you could have moved to a different position to take the picture, to give the impression more of going through the gate, but it is still a very pleasing picture.
-
28th September 2012, 12:09 PM #16
- Join Date
- May 2012
- Location
- northern Virginia suburb of Washington, DC
- Posts
- 19,064
Re: Morvern viewd from Mull
Yes, that!
Now that I realize that your camera is set to sRGB, use the Picassa settings at least for now to set everything also to sRGB.
Once you read about color profiles, you might decide to configure your camera to a different color profile that has a wider gamut, such as ProPhoto or Adobe RGB. You might also configure Picasso to open images using a color profile with a wider gamut and to save your master image with that profile embedded in it. If so, you would embed the sRGB profile only in images that you intend to be viewed on the Internet.
I use sRGB for all of my settings, though for very specific and informed reasons that are most definitely contrary to widespread thought. Whatever color profile you use for each situation, you'll be far better off if you make informed decisions about that. Sooner is much better than later.
Last edited by Mike Buckley; 28th September 2012 at 12:15 PM.
-
28th September 2012, 12:13 PM #17
- Join Date
- Aug 2011
- Location
- Wick, Caithness, Scotland.
- Posts
- 2,609
- Real Name
- Sharon
Re: Morvern viewd from Mull
Thanks Ivor and to frank whose post I missed at the time.
-
28th September 2012, 12:19 PM #18
- Join Date
- May 2012
- Location
- northern Virginia suburb of Washington, DC
- Posts
- 19,064
Re: Morvern viewd from Mull
Sharon: I dramatically edited my previous post to provide more information. Be sure to review it. Otherwise, you'll miss out on my words of wisdom.

-
28th September 2012, 12:27 PM #19
- Join Date
- Aug 2011
- Location
- Wick, Caithness, Scotland.
- Posts
- 2,609
- Real Name
- Sharon
Re: Morvern viewd from Mull
Originally Posted by Mike Buckley
Ooooh...that would never do!
Thanks Mike.
-
28th September 2012, 02:47 PM #20

- Join Date
- Jul 2008
- Location
- Southern California, USA
- Posts
- 17,409
- Real Name
- Richard
Re: Morvern viewd from Mull
Sharon I love the image but, have you considered cropping a bit of the sky off, making the wide side longer than the tall side? It seems to me that places more emphasis on the spit of land rather than equally dividing interest between land and sky.
It is certainly a beautiful vista, no matter how it is cropped...

 Reply With Quote