
 Helpful Posts:
 Rram, what Colin states above.Originally Posted by Colin Southern

Results 21 to 38 of 38
Thread: Low Light Photography
-
16th November 2013, 07:13 AM #21


- Join Date
- Jun 2013
- Location
- Chennai India
- Posts
- 627
- Real Name
- Haseeb Modi
Re: Low Light Photography
-
21st November 2013, 01:35 AM #22
- Join Date
- Oct 2013
- Location
- NJ, USA
- Posts
- 25
- Real Name
- Ram
Re: Low Light Photography
Reason for softness is it because of shooting at f1.8? Or is there anything i need to check. After going through all the post i have started shooting at max of 2.8.
-
21st November 2013, 01:40 AM #23
- Join Date
- Dec 2008
- Location
- New Zealand
- Posts
- 17,660
- Real Name
- Have a guess :)
Re: Low Light Photography
Hard to say. How are you achieving focus (ie are you placing an AF point over the eye, or just letting the camera chose an AF point from all that are available)? Originally Posted by RRAM
At wide apertures eg >F2.8 you'll need to be a considerable distance from your subject to get everything in focus; if you use a wide aperture and you're up close then you'll only get selective focus in certain areas which can be effective, but until you've mastered what you're doing then it'll probably make your results more "miss" than "hit".
I'd suggest shooting around F5.6 to start with - ISO 400 - and see show your shutterspeeds look from there.
-
22nd November 2013, 03:36 PM #24
- Join Date
- Oct 2013
- Location
- NJ, USA
- Posts
- 25
- Real Name
- Ram
Re: Low Light Photography
Collin, I checked the AF Area select mode is set to automatic selection. for this photograph i was pretty close to the subject. With the 50mm lens when in Auto Focus mode i seems to b continously adjust doesnt seem to be stop
-
22nd November 2013, 03:42 PM #25
- Join Date
- Dec 2008
- Location
- New Zealand
- Posts
- 17,660
- Real Name
- Have a guess :)
Re: Low Light Photography
If the AF is set to automatic selection it'll generally focus on whatever is closest to the camera which in the case of a face will probably be the chin or tip of nose. That in itself isn't necessarily an issue, but when you have a razor-thin DoF due to being in close with a wide aperture, that will cause significant issues. Originally Posted by RRAM
Best suggestion is to use an aperture like F5.6 - get a little further away - and use only 1 AF point that you place over an eye before taking the shot.
Also, if the camera is continuously focusing then you've probably got the camera in SERVO AF focus mode -- you normally want it in 1-Shot AF mode.
I'm off to bed (4:42m here!) - just start another thread with regards to focusing and I'm sure many will jump in to help you more.
-
23rd November 2013, 08:23 AM #26
- Join Date
- Apr 2012
- Location
- Dunedin New Zealand
- Posts
- 2,697
- Real Name
- J stands for John
Re: Low Light Photography
I only worked on the color version and found by selecting out the eyes, his right eye needs more than the quite sharp left eye, and finally a sharpening all over I got a satisfying result. I am using Paint Shop Pro X6 and highpass sharpening.

I didn't look at the B&W version becuase it looks very soft. I suspect the camera was focusing on the boy's left eye.
PS when I used my greyscale tool to make a B&W version there was no loss of focus ... perhaps you like the soft B&W result and that was what you were after?
PPS After a play with the B&W I revise my opinion and selecting out just the eyes is all it needs to make a satisfying photo [ a similar result to the color version ]
A nice shot of the young fellow whichever treatment you prefer. If you can consistently do this you may not need flash which is my prefered way of working [ ambient light]. I have several flash units but they rarely get used.
Elsewhere portraitists have written that they prefer to work at f/5.6 - f/8 for reliability in focus.
of 'takers' on a professional basis.
Not my thing and even my grand-daughter is nearly an adult so no need
Last edited by jcuknz; 23rd November 2013 at 08:47 AM.
-
23rd November 2013, 11:07 AM #27

- Join Date
- Aug 2012
- Location
- S, B'ham UK
- Posts
- 3,337
- Real Name
- John
Re: Low Light Photography
Looking at the original the shallow depth of field can be seen in the clothes and the "chair back" if that is what it is. is also in focus.
There are a couple of things you can do about this. One is to shift to F5.6 and up the ISO setting for an exposure of say 1/30 sec, that as most should be able to use that speed if they squeeze rather than press the shutter button. If you are using jpg's it will usually be a good idea to set the camera to auto noise reduction.
The other way is to stick with the F1.8 and move further away from the subject and crop what you actually want out of the shot.. Depth of field calculators are of use for this sort of thing especially initially. As a for instance they suggest that the DOF of an F1.8 at 5ft is 2,4in. Move back to 10ft and it's 9.7in. Fine for head shots with a correct focus. Can't advise you on how far this route to a solution can go but it's easy to take some shots and find out. To give you some idea with a decent lens it's perfectly possible to view an image full size and crop small shots out of that without any reduction in size at all. How much reduction that is needed for a good shot on a PC screen or even a print depends on the quality of the lens. Detail in the shot too. The worse the lens the more reduction is needed.
Actually the latter method is the best way to use fast apertures to get round light level problems and worth remembering. It also has implications on longer focal lengths. A 100mm F1.8 lens has the same depth of field at 10ft as the 50mm at 5ft. Some times it's best to crop in that situation rather than go longer. When shooting like this the best option is likely to be centre weighted metering. AF on the furthest eye or maybe somewhere on the clothes to neck boundary if enough DOF and all needs to be sharp.
The best option for cheaper bounce flash is an old fashion auto hammer head that also has a fill in flash. There is a need to carefully check that it can be set in a way that is suitable for digital camera as they were aimed at low iso work. Also check that the voltages they apply to the camera are within limits. The max volts for the camera will be some where in the manual and there are web sites that list flash gun hot shoe voltages. Not a bad idea to check with a cheap digital voltmeter just in case. There are also parts available that fit into the flash shoe and isolate the camera from the flash. Still best to go for a low voltage flash though - . Not sure I trust them. Many hammerheads with many settings are low voltage. Not that cheap either as they often fetch high prices.
John
-
-
23rd November 2013, 11:15 AM #28
- Join Date
- Dec 2008
- Location
- New Zealand
- Posts
- 17,660
- Real Name
- Have a guess :)
Re: Low Light Photography
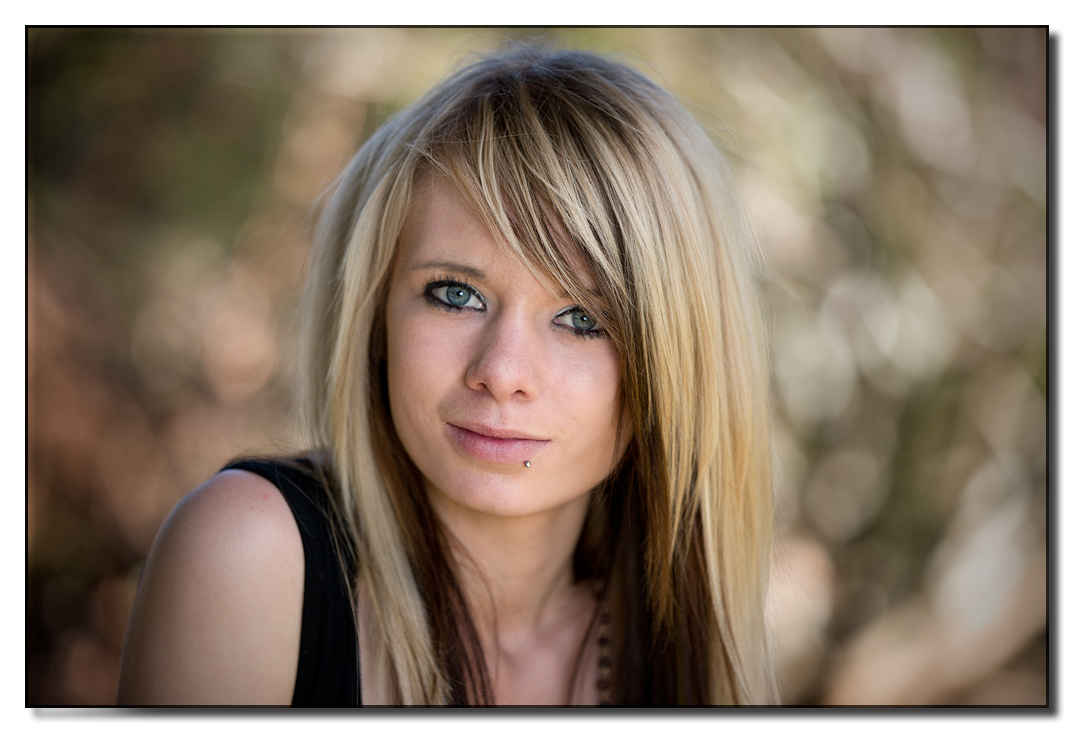
As a comparison, here's one I shot with the equivalent focal length (85mm on a FF camera) F2.8 (little wider) and a little further away, with correct focusing ...

Here's a 100% Crop of the original:

The OP should be able to get close to this quality with the gear that he has.
-
23rd November 2013, 12:31 PM #29
- Join Date
- Aug 2012
- Location
- S, B'ham UK
- Posts
- 3,337
- Real Name
- John
Re: Low Light Photography
Excellent background blur on that one Colin. It does make the subject stand out.
I still haven't got an accurate feel for that with colour. Bit of an exaggeration but I usually don't add enough due to the dam viewfinders these days. I'm hoping m 4/3 works out better.
John
-
-
23rd November 2013, 12:57 PM #30
- Join Date
- Dec 2008
- Location
- New Zealand
- Posts
- 17,660
- Real Name
- Have a guess :)
Re: Low Light Photography
Thanks John. Originally Posted by ajohnw
Wide apertures work well for that -- just so long as folks don't get too close:
-
24th November 2013, 01:45 AM #31
- Join Date
- Apr 2012
- Location
- Dunedin New Zealand
- Posts
- 2,697
- Real Name
- J stands for John
Re: Low Light Photography
I suggest that you should be cautious about taking somebody's word after they looked at some DOF tables and spouted the figures at different distances which ignores the point that as you crop and enlarge for the same composition you loose depth of field. As Stagecoach pointed out awhile back you do gain depth of field by holding back instead of going in close but this is offset by the degree of enlargement required.
The simplest way to use old high voltage flash units is by getting optical triggers and using the camera flash to trigger them.
For minimum of distratction of the subject you could organise a flash bouncing off the ceiling and triggered by the camera whose flash is partially masked off from the subject so enough light escapes to trigger the remote flash.
However that is my old technology of some years back and now I have YongNuo flash units, and there are models reversed engineered to work TTL with your camera, used to be the 486[Canon] but there are newer models now.
From my experiment in using some silver paper to direct my bridge camera flash up at my yellow ceiling [ ] I am sure that the on-board flash of your camera would work as well or better, it appears to be twice as strong as my bridge camera. Dpreview says your camera is good to 13 metres while my FZ50 is only 7metres both at 100 ISO.
Although it is a doll I kept back to simulate the distance the onboard would have been from a child and this is cropped as a result. With its smaller sensor and shorter actual lens the FZ50 has much more DoF than a DSLR doing the same job, but conversely the degree of enlargement for a given image size is greater.

If you do go for old high voltage and cheap units this site may tell you their voltage
http://www.botzilla.com/photo/strobeVolts.html
But my feeling these days the difference between a cheap HV flash plus an optical trigger is not going to be much less than the up-to-date YN flash with its built-in optical trigger, rotating head and vertical tilt for bounce work. They have a quarter inch Whitworth thread in their bases so to work it as a remote you just need a screw and a piece of wood to hold it sat up on a high shelf or somewhere .... I don't know what your financial situation is so ignore these DIY suggestions if not applicable
PS. There is a gadget sold in the States which fits over the on-board flash and directs the light upwards but sorry the name escapes me. Trying to find out for you.
PPS One source which looks better than what I thought I had read about is
http://dembflashproducts.com/popup/ .... has the advantage that some of the light goes directly to give catch-lights and lighten the 'bounce shadows' under eyebrowns, forward hair styles as in my model and dark trousers on full length men etc.Last edited by jcuknz; 26th November 2013 at 06:14 AM.
-
24th November 2013, 06:42 PM #32
- Join Date
- Jun 2011
- Location
- Massachusetts, USA
- Posts
- 98
- Real Name
- Frank Deland
Re: Low Light Photography
Quick reply:
Shoot with a shutter speed equal to or greater than the focal length. For example, with the lens at 200mm the shutter speed should be at least 200., etc.
So, set the camera to Shutter Speed priority, set the speed to 200, set the ISO to Auto.
-
24th November 2013, 09:05 PM #33
- Join Date
- Aug 2012
- Location
- S, B'ham UK
- Posts
- 3,337
- Real Name
- John
Re: Low Light Photography
It's me that has pointed out that DOF tables take no account of image size several times but. in respect to smaller sized images that have been reduced from the full sized one and hyperfocal distance calculations which in terms of actual usability are a bit difficult anyway. Originally Posted by jcuknz
In this particular case the use of DOF calculations is a common method of handling low light plus the shallow depth of field problems associated with fast lenses and not using flash. The aim is best possible resolution as the shot is going to be cropped so if the calculator used does it's job correctly all will be well. DOF calculators are useful for getting a feel for what the likely outcome is.
Perhaps I should not have used the words common method as I have never seen it on the web. However Colin did mention standing back a little further and showed the crop. One fact for sure is that dof does increase with distance. How accurate typical DOF calculators are - pass.
You are correct that I reeled of figures from a calculator in order to illustrate the point. What else could I do? This one
http://www.dofmaster.com/dofjs.html
He assumes a base circle of confusion of 0.030mm which is what Canon have used for calculating the depth of field of their lenses. Some use smaller figures. When it's not a 35mm full frame camera as in this case he reduces it's diameter. 0.019mm for APS and 0.015 for 4/3. This explains some problems I have experienced since switching to m 4/3 as I didn't stop to think just noted comments on the web. He is using a circle of confusion that = diagonal of format/1500. If some one experiences problems with the sharpness of the images the calculator gives the answer further down the list of cameras - specific diameters. As I mentioned the calculators can be used to get a feel for it. I didn't go into this as it's a rather woolly subject. Try it is the best answer and go smaller if needed. Basically no one looks at prints or the pc screen normally from 10in. Some one a long time ago decided on this and that the lowest viewing angle that would be use in practice is 60 degrees included. That probably works out for a 10x8 print as well.
Why a problem on m 4/3 - say I have a 12mp full frame image and a 12mp 4/3 image and view them on the screen. Both are loosely speaking the same size but the 4/3 has been magnified more. Same thing if I print the same sized image from each. Taking one of the figures I quoted a 40mm F1.8 m 4/3 lens has a depth of field on 13in at 10ft. 50mm APS 9.7in. There isn't as much difference as I thought. Just goes to show - best find out. I thought I would be OK shooting spiders from 200mm or so at F11. On the other hand the results show that viewing prints at 10in doesn't really hold up.
John
-
-
24th November 2013, 11:56 PM #34
- Join Date
- Dec 2008
- Location
- New Zealand
- Posts
- 17,660
- Real Name
- Have a guess :)
Re: Low Light Photography
It doesn't work that well in practice. For starters, if you shoot in Tv mode then you're giving up aperture control (which in a low light situation will mean that the camera will generally shoot wide-open with a resultant minimal DoF), and with IS/VR lenses the old 1/focal length rule of thumb for hand-holding is essentially thrown out the window anyway) (with IS on I can hand hold my 200mm lens as low as 1/12th). Originally Posted by rambler4466
-
25th November 2013, 09:21 AM #35
- Join Date
- Apr 2012
- Location
- Dunedin New Zealand
- Posts
- 2,697
- Real Name
- J stands for John
Re: Low Light Photography
We all probably have our own miraculous examples of good results at impossible shutter speed, mine is I think it was 1/20 with a 950mm rig ... saw something and pressed the trigger without checking how the camera was set from previous shot, camera in A mode
But for reliability it is best to follow the 'rule' modified by two stops thiough some makers claim four stops
-
25th November 2013, 10:27 AM #36
- Join Date
- Aug 2012
- Location
- S, B'ham UK
- Posts
- 3,337
- Real Name
- John
Re: Low Light Photography
I don't think the old rule is much use either really. It varies from person to person and cost more to find out when film was used. No problem at all on digital but people for some unknown reason still want a rule.
Really some ones stance when taking the shot and factors like is there some where to sit down and rest elbows on knees is more important. Even crouching down can have an effect. Also recent physical effort going to the ridiculous but even that will have an effect at times. Also are you young, old or unusually fit etc..
John
-
-
26th November 2013, 07:41 PM #37
- Join Date
- Oct 2013
- Location
- NJ, USA
- Posts
- 25
- Real Name
- Ram
Re: Low Light Photography
I went back to original image and tried to process it again...when i did the first time i went with what i felt looked good to me.... comments please
https://www.facebook.com/media/set/?...1&l=0490b405d1
-
26th November 2013, 08:11 PM #38
- Join Date
- Apr 2012
- Location
- Dunedin New Zealand
- Posts
- 2,697
- Real Name
- J stands for John
Re: Low Light Photography
As we have said you have a pleasing photograph of your boy which can be adjusted if you have the editing tool and think it is desirable... Colin uses Photoshop, I use Paint Shop Pro, but probably the same could be done with Paint dot Net which is a free downlooad
Just tried it and it did it for me once I worked out how the programme is organised, its awhile since I used it
ireverent note ... perhaps Paint.Net is the answer now PS is up in the sky ?

 Reply With Quote