
I wanted this but it's biggest problem is low detail under the bridge. How best to sort it, leave as silhouette maybe?
 Helpful Posts: 0
Results 1 to 20 of 23
Thread: How do you deal with low detail?
-
15th May 2011, 01:16 PM #1


- Join Date
- Sep 2009
- Location
- Burton on Trent, UK
- Posts
- 4,788
- Real Name
- Steve
How do you deal with low detail?
-
15th May 2011, 01:29 PM #2New Member
- Join Date
- May 2011
- Posts
- 3
- Real Name
- James
Re: How do you deal with low detail?
If you have the raw image, possibly raise the contrast ratio.
-
15th May 2011, 04:54 PM #3rob marshall
Re: How do you deal with low detail?
Use 'fill light' in RAW (if you have Photoshop). It increases detail in dark areas non-destructively, but only if the areas are not completely black (which yours aren't).
-
15th May 2011, 05:13 PM #4
- Join Date
- Jul 2009
- Location
- Kolkata - INDIA
- Posts
- 537
Re: How do you deal with low detail?
 Originally Posted by arith


Done In Photoshop
IMAGE > ADJUSTMENT > SHADOWS / HIGHLIGHTS
Move shadow slider to 40% and HIGHLIGHTS slider to 92% and you will get considerable details in shadow portion
-
15th May 2011, 07:52 PM #5
- Join Date
- Jan 2009
- Location
- South Devon, UK
- Posts
- 14,559
Re: How do you deal with low detail?
With this sort of photo, Steve, I normally use the combination of two exposures on layers method then merge the two together with a bit of selective masking.
Duplicate layers, from one original, can be adjusted separately or better still, two copies can be made from the same Raw file but with different exposures, like Rob said, then combined. It takes a bit of careful selective brushwork but isn't particularly difficult.
That photo is certainly worth taking a bit of time to get everything perfect.
-
15th May 2011, 08:18 PM #6
- Join Date
- Feb 2010
- Location
- Cambridge UK
- Posts
- 91
- Real Name
- John
Re: How do you deal with low detail?
If you are not familiar with this method of lightening shadows and darkening highlights while keeping detail it can work very well. If you are, I apologise. I hope someone else may find it useful.
1.Duplicate the background layer twice so you have 3 layers.
2.Click off the eyeball for the top layer so it is not visible.
3.Click on the middle layer to activate it.
4.Desaturate it
5.Invert it.
6.Change the blending mode to Overlay. This brings back the image with lightened shadows and darkened highlights. Detail is now poor.
7.To bring the detail back apply a Gaussian blurr to this layer. It needs to be a hefty blurr, 20-30 pixels or even more. Unintuitive, and always impresses me.
That may be all you want to do but if you like what it has done to the shadows but not the highlights, click on the top layer eyeball to make that layer visible and change the layer blending mode to lighten. This allows the shadows to lighten but not the highlights to darken. Set the blend to darken if you want to darken the highlights and leave the shadows unaffected. If you want to go further flatten, and apply a curve or whatever else you want.
I have found this often works well when other methods don't work as well as expected. It should work with older versions of Photoshop and Elements and any program which has layers, control of saturation, and contrast blending modes such as Overlay.
Here is the result of trying it on you shot of Tower Bridge (I hope that is OK) with just the shadows lightened. I hope you can see it has brought out detail but it will look a lot better with your orginal RAW file.
-
16th May 2011, 12:22 AM #7
- Join Date
- Sep 2009
- Location
- Burton on Trent, UK
- Posts
- 4,788
- Real Name
- Steve
Re: How do you deal with low detail?
That is really interesting and looks like I would like to see it John. I don't understand why it would work but the pic is right. Originally Posted by ANSORB

-
16th May 2011, 12:32 AM #8
- Join Date
- Sep 2009
- Location
- Burton on Trent, UK
- Posts
- 4,788
- Real Name
- Steve
Re: How do you deal with low detail?
Cheers Geoff, I like this one because I couldn't see the dials in the viewfinder or much of the scene. I worked it on the outside instrument on top of the camera to find a brightest spot, but then if I did it properly I wouldn't even have taken the photo. The ev range is too high.
Looks like I got lucky if I can either better selectively reduce noise or increase brightness even though 100% fill is applied already. It is a bit darker due to further processing in an attempt to hide problems.
-
16th May 2011, 12:35 AM #9
- Join Date
- Sep 2009
- Location
- Burton on Trent, UK
- Posts
- 4,788
- Real Name
- Steve
Re: How do you deal with low detail?
Looks impressive Ashwin; I think I will do inbetween the two.
-
16th May 2011, 12:39 AM #10

- Join Date
- Nov 2010
- Location
- Manila, Philippines
- Posts
- 3,804
- Real Name
- Willie or Jiro is fine by me.
Re: How do you deal with low detail?
Dodge and Burn, Steve. The simpler process to lighten or darken a part of an image without introducing a lot of artifacts. When you do an edit, don't do the adjustments while the image is zoomed in on your screen. It may look right to you but when you zoom out again, you would notice that you have applied too much dodging. Do the adjustment on a fit to screen mode so you can find out the right kind of brush size, brush opacity, brush flow, and brush feathering to use. Hope this helps. That is a very nice shot, Steve.
-
16th May 2011, 12:40 AM #11
- Join Date
- Sep 2009
- Location
- Burton on Trent, UK
- Posts
- 4,788
- Real Name
- Steve
Re: How do you deal with low detail?
Cheers Rob, I used ACR with 100% fill, but I pulled back a bit after cleaning noise. My question has been answered in that I shouldn't have pulled back a bit. But I think better definition is needed for a lighter version with potential method indicated above. Originally Posted by rob marshall
-
16th May 2011, 12:45 AM #12
- Join Date
- Sep 2009
- Location
- Burton on Trent, UK
- Posts
- 4,788
- Real Name
- Steve
Re: How do you deal with low detail?
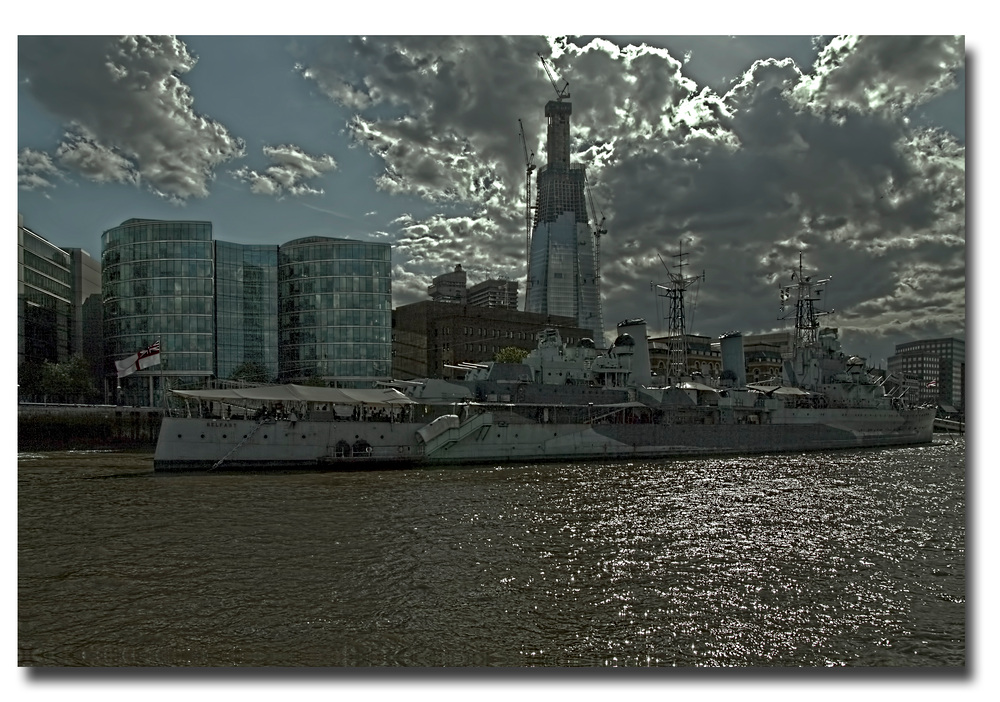
Cheers Willie; you ain't seen the big boat or st paul's or the morris men or the demonstrators, all sorts I haven't got round to and all with special problems. I like this one though. Originally Posted by jiro
-
16th May 2011, 12:53 AM #13
- Join Date
- Nov 2010
- Location
- Manila, Philippines
- Posts
- 3,804
- Real Name
- Willie or Jiro is fine by me.
Re: How do you deal with low detail?
I had a lot of catching up to do, then. I got away for 2 days. Originally Posted by arith

-
16th May 2011, 02:10 AM #14
- Join Date
- Nov 2010
- Location
- Panama City, FL
- Posts
- 3,540
- Real Name
- Chris
Re: How do you deal with low detail?
I am going to toss in a small wrench to bog up the works a bit, but the sun is above and behind the bridge. The spans at the top of the bridge are far too high to be overly influences by the waters refraction, especially to the degree shown by John, (which, by the way, has made a superb edit if he/she who is looking isn't an art teacher).
It would have made a much better sillouette with some good highlighting on the top planes but not on the bottom nor on the face. You can't have it both ways unless you have someone across the Thames with one heck of a big fill card. Call Christo.
-
16th May 2011, 06:36 AM #15
- Join Date
- Feb 2010
- Location
- Cambridge UK
- Posts
- 91
- Real Name
- John
Re: How do you deal with low detail?
Always good to have people around who can make helpful criticisms. I didn't altogether like my result either - now I know why. However, it did what Steve wanted and that was the reason for posting, and you can always modify it further. Originally Posted by MiniChris
-
16th May 2011, 09:08 AM #16
- Join Date
- Sep 2009
- Location
- Burton on Trent, UK
- Posts
- 4,788
- Real Name
- Steve
Re: How do you deal with low detail?
Cheers Chris; I was sort of trying to make it look like I saw it but fill in ACR raises everything. It is also a tiny image in ACR and I found out the problem after opening and so darkened it using a 50% difference layer over a 100% multiply with Gaussian blur sandwiched in a lot of layers. Originally Posted by MiniChris
I got the idea from the help that it would be better brighter at the top, but only a bit brighter.
Of course the definition was removed by a noise control program Topaz DeNoise5 which required aggressive settings, but also in this case a brush noise removal. The settings were very aggressive in the red and blue channels to remove CA which is always present to some degree.
Maybe I can do that better as well.
-
16th May 2011, 10:56 AM #17
- Join Date
- Sep 2009
- Location
- Burton on Trent, UK
- Posts
- 4,788
- Real Name
- Steve
Re: How do you deal with low detail?
Same problem but different reason: underexposed because the light went behind a cloud and this boat is moving. I obviously am rubbish at taking photo's.
I used a variation of Johns method on this, but again bad detail. I think my brain goes elsewhere when I am taking photo's under time limits: I could have used a small aperture with no ill effects in these, but I'm so used to working within diffraction limits things only change if I start thinking about dof.
Too late now, those cruisers don't half move; there was a gap under Millennium bridge showing St Paul's and I wasn't even quick enough to expose on the sky and so most of the sky is blown I think it is a recolor job.
Last edited by arith; 16th May 2011 at 11:37 AM.
-
16th May 2011, 11:31 AM #18

- Join Date
- Jan 2011
- Location
- Sydney Australia
- Posts
- 290
- Real Name
- Graham
Re: How do you deal with low detail?
Steve,
I like the image with the contrast and amount of detail you have already, but the changes that Ashwin made lift the bridge nicely. I use a technique that uses a negative overlay just like an old fashioned dark room.
- make a new adjustment layer
- invert so that you have a negative image on the layer
- desaturate so the negative is monochrome
- apply a blur filter to the layer (Gaussian blur) experiment with the amount but it can take more than you expect.
- Change the layer mode to overlay
- Adjust fill and density of the layer to suit.
- If you get too much halo reduce the amount of blur
I use it a lot but usually sparingly as it can give a rather unrealistic appearance. It also brightens the image generally so other adjustments and layers may be necessary.
Here in OZ our light can be very harsh and this works like the old zone system for compressing contrast without losing detail.
Another matter though is that I think your choice of subject is a problem. I have a personal grudge with that bridge. It tried to kill me and my wife two years ago this month.
Good luck and don't get into lifts.
Graham
OOps didn't notice that someone else put up the same advice. Sorry
-
16th May 2011, 01:55 PM #19
- Join Date
- Jul 2009
- Location
- Kolkata - INDIA
- Posts
- 537
Re: How do you deal with low detail?
Originally Posted by arith

Steve
I have made this with very simple method in photoshop
Duplicate background change mode to SCREEN
press control + J in pc ( window ) to duplicate layer
change mode to SOFT LIGHT and opacity to 33 % or as you would like
press control + e to merge all layer and it is done
How would you like this method...?Last edited by Ashwin; 16th May 2011 at 02:07 PM.
-
16th May 2011, 02:01 PM #20
- Join Date
- Feb 2010
- Location
- Cambridge UK
- Posts
- 91
- Real Name
- John
Re: How do you deal with low detail?
When you do an edit, don't do the adjustments while the image is zoomed in on your screen. It may look right to you but when you zoom out again, you would notice that you have applied too much dodging. Do the adjustment on a fit to screen mode so you can find out the right kind of brush size, brush opacity, brush flow, and brush feathering to use. Hope this helps. That is a very nice shot, Steve.
Good point Jiro but Photoshop lets you edit in a zoomed view and view the effect on smaller view at the same time. Under <Windows>Arrange> there is an item at the bottom of the drop down menu "New window for.........." whatever image you have active on your desktop. The advantage is that whatever you do to one is reproduced at the same time on the other, so you can work on the zoomed view and see the result on the full (smaller) image. Ideal if you have dual monitors but works quite effectively on one.


 Reply With Quote